
Custom Christmas Ornament Print on Demand: A Practical Guide
Picture this: you’ve just finished wrapping the last gift, the tree is glittering, and you hear that familiar jingle of ornaments being lifted off the shelf. Suddenly you think, ‘What if I could design a keepsake that captures my family’s unique holiday vibe and sells for me at the same time?’ That moment of spark is exactly why custom Christmas ornament print on demand has become a quiet holiday hero for busy mums, dads, teachers, and nurses.
In our experience at TeninoVentures, the simplest ornaments often start as a doodle on a napkin – maybe a tiny hand‑print from your kid, a school mascot, or a stethoscope silhouette for a fellow nurse. Then we feed that design into a POD platform, and within days a batch of high‑quality, personalised ornaments is ready to ship. No inventory, no upfront costs, just a ready‑to‑gift product that feels personal.
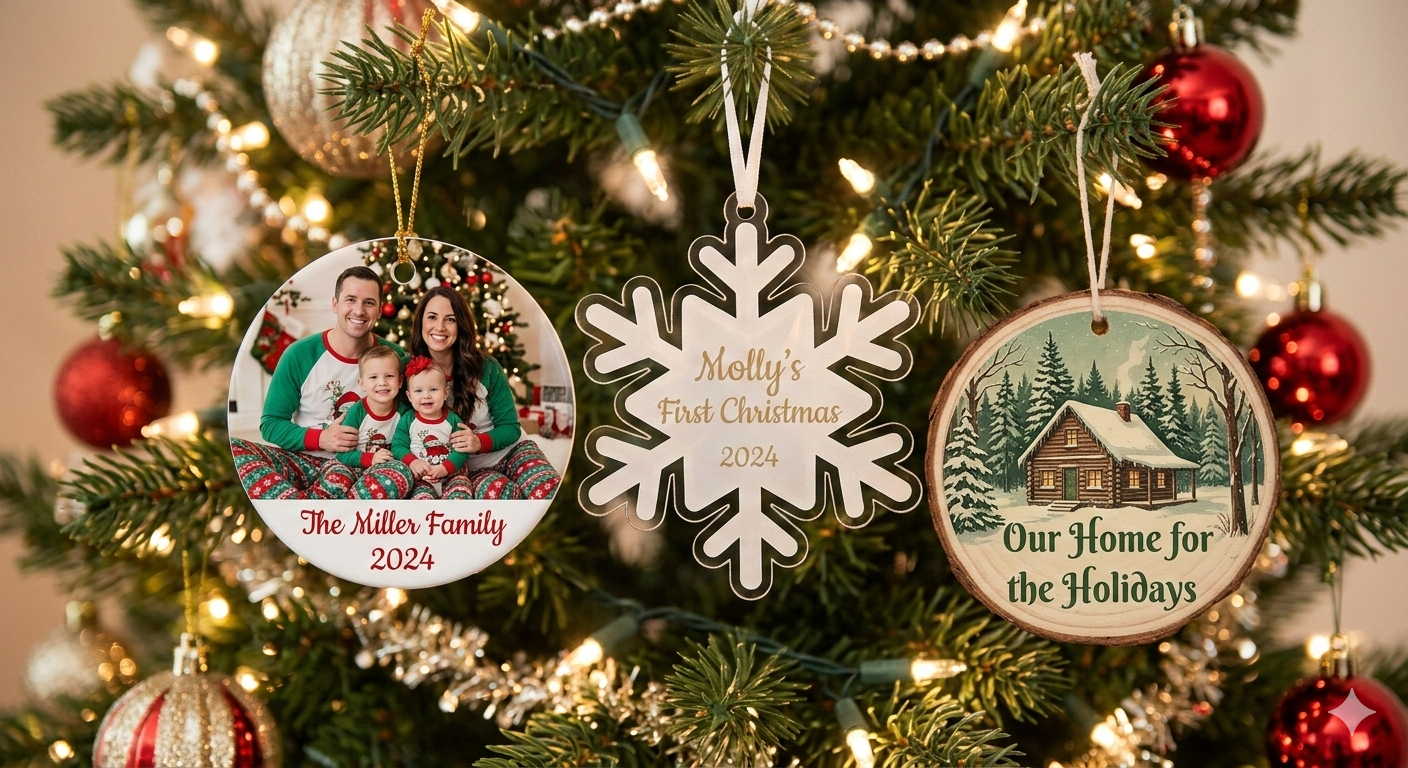
Real‑world example: a mom in Portland turned her toddler’s crayon snowmen into a limited‑edition ornament set. She listed them on Etsy, priced them at $19 each, and sold out the first batch in a week. The secret? She paired the product with a short, heartfelt story on the listing and used a festive mock‑up that showed the ornaments hanging on a real tree. The authenticity resonated with other parents looking for something beyond the generic store‑bought baubles.
Another scenario: a high‑school teacher created a series of ornaments featuring classic literature quotes for her book club alumni. By offering a small discount for bulk orders (e.g., 10‑plus ornaments), she turned a simple hobby into a fundraiser that covered classroom supplies. The key steps she followed were:
- Sketch the design and digitise it using a free tool like Canva.
- Upload the PNG with a transparent background to a POD provider that supports metal or acrylic ornaments.
- Order a sample to check colour fidelity and finish.
- Set up an Etsy listing with clear photos, a concise description, and a heartfelt backstory.
Does this sound doable? Absolutely. If you’re wondering where to start, here’s a quick checklist you can copy‑paste into your notes:
- Identify a personal or community theme (family name, school logo, nursing badge).
- Choose a POD service that offers holiday‑season production windows.
- Create a high‑resolution (300 dpi) design with a transparent background.
- Order a proof to confirm size and colour.
- Launch the product with a limited‑time holiday discount.
And if you’re looking for broader POD strategies, you might find 6 essential tips to boost sales for your POD products useful – many of the same principles apply across ornaments, mugs, and tote bags.
So, grab that sketchbook, think about the people who’ll hang your ornament on their tree, and let the print‑on‑demand magic turn a simple idea into a holiday bestseller.
TL;DR
If you’re a busy mom, dad, teacher or nurse dreaming of turning a simple doodle into a sell‑able holiday keepsake, custom Christmas ornament print on demand lets you design, produce and ship personalized baubles without inventory or upfront costs.
Just sketch, upload a transparent PNG, order a proof, and list it on Etsy – the whole process takes a weekend, and you can start earning as soon as the first orders roll in.
Step 1: Choose a Design Platform for Custom Christmas Ornament Print on Demand
Alright, you’ve got that spark – a doodle of a snowflake, a tiny handprint, maybe a stethoscope outline. The first real decision is where you’ll turn that sketch into a printable file. The platform you pick will dictate how easy it is to upload, preview, and order a proof before you list the bauble on Etsy.
What to look for in a platform
First off, ask yourself: does the service support transparent PNGs at 300 dpi? That’s the sweet spot for crisp, colour‑accurate ornaments. Second, check if they offer metal or acrylic options – metal gives that premium feel, acrylic keeps it lightweight. Third, look for a mock‑up generator; nothing beats seeing your design on a virtual tree before you spend money.
In our experience at TeninoVentures, we gravitate toward platforms that give a quick turnaround during the holiday season. When production windows shrink, you don’t want a provider that promises a two‑week lead time for a December launch.
Free vs. paid tools
Many creators start with free design apps like Canva or GIMP, which are fine for simple shapes. But if you need precise colour profiles or vector scaling, a modest subscription to Adobe Illustrator can save headaches later. The key is not to over‑engineer – a clean PNG is all you need for most POD services.
Does this feel overwhelming? Not really. Think of it like picking a kitchen gadget: you don’t need a sous‑vide for a grilled cheese, just a good pan. Same with design platforms – pick one that matches the complexity of your ornament.
Testing the waters with a sample
Before you go live, order a single proof. This tiny investment lets you verify that the colours don’t shift, the size feels right, and the finish (glossy vs. matte) matches your vision. If the sample looks off, you can tweak the file and re‑order – no wasted inventory.
Pro tip: keep a spreadsheet of platform fees, production costs, and shipping rates. That way you can price your ornament so you cover costs and still make a tidy profit.
So, what’s a good starting point? If you’re comfortable with a drag‑and‑drop interface, try a platform that integrates directly with Etsy – the sync saves you a ton of manual work.
Now that you’ve watched the quick walk‑through, let’s talk about the little things that make a big difference. When you upload your design, double‑check that the background is truly transparent – a stray pixel can turn a beautiful bauble into a messy white square.
Another detail: add a short, descriptive file name. Instead of "design1.png," use something like "mom‑snow‑flake‑2026.png". It helps the POD service keep track of your files and makes troubleshooting easier.
If you ever need a quick way to share the proof with a friend or a fellow teacher, consider using a simple email collaboration tool. It keeps feedback loops short, which is crucial when you’re racing against the holiday rush.
Lastly, remember that the platform you choose isn’t set in stone. As your ornament line grows, you can switch to a provider with bulk discounts or specialty finishes. Flexibility is one of the biggest perks of print‑on‑demand.
Step 2: Prepare Your Artwork for High‑Quality Ornament Printing
Let’s get practical about preparing artwork for high‑quality ornament printing. The quality you deliver starts long before you click upload, right at your workstation with careful choices. This step is where a tiny detail becomes a cherished keepsake your customers will treasure.
First, lock in the technical specs: aim for 300 dpi resolution, save as PNG with a transparent background, and design so elements sit safely within the printable curve. If you’re designing in a standard drawing tool, set the canvas to at least 300 dpi from the start to avoid blurry edges. Small mistakes here snowball during proofing, so double‑check every layer before you export.
In our experience at TeninoVentures, starting with a clean, high‑resolution canvas reduces color surprises later and makes proofs easier to approve. That means fewer headaches during review calls and happier customers unwrapping gifts. Treat this as the foundation you build everything else on, not an afterthought.
Know your print area
Different ornaments have different printable zones, so you need precise measurements before you start drawing. Measure the safe margins and confirm where the design will sit on round versus flat shapes because perspective changes. If you’re unsure, print a quick cardboard mock‑up to visualize the real footprint and avoid surprises.
Size and safe zone
Keep key elements at least 1/8 inch from the edge to prevent edge clipping during the wrapping process. Check how the design sits when the ornament curves in multiple directions, not just straight on. This simple size planning saves you from costly reprints or disappointed customers.
Color management matters
Your screen and the final print live in different worlds, so color fidelity is a real risk. Calibrate your monitor and start from the sRGB baseline, then soft‑proof against your chosen ornament stock and finish. If colors look off in proof, adjust the artwork in small, layer‑by‑layer tweaks rather than redoing everything.
Proofing workflow
Always order a physical proof before listing; this is where you catch issues your screen won’t reveal. Inspect color fidelity, finish, and alignment on the actual ornament shape, not just a flat mock‑up. Use that proof to guide any tweaks and prevent last‑minute surprises during the holiday rush.
Mockups help, but real proof seals it. Generate realistic mockups showing the ornament on a tree branch or in a festive scene for better buyer imagination. That finish check can save you time, returns, and unhappy customers after the first batch ships.
If you want a broader view of POD design, our guide Everything You Need to Know About Custom Floral Mug Print on Demand covers design decisions that translate to ornaments.
File naming and asset organization
Name files clearly with a logical convention, like ornament_A1.png, and keep a backup of the original layered source file so you can revisit edits easily. Store all PNGs, fonts, and color profiles in a dedicated project folder that mirrors your product line. This discipline saves you from last‑minute scrambling when you need to scale up or fulfill holiday orders.
Production planning and timing
Coordinate with your POD partner on production windows, proof rounds, and deadline dates so your customers get gifts on time. Build a small production calendar that includes a weekend proof, a final sign‑off, and a buffer for shipping delays. Having that plan lets you respond calmly when rush orders appear.
So, what’s next? Sketch a few motif ideas, lock in the specs, and run a tiny ornament proof set this weekend. If you treat this step seriously, you’ll reduce errors and delight buyers from teachers to nurses. We’ve seen it work, and you can start today, even with a simple doodle.
Step 3: Select Materials, Finishes, and Sizes
Okay, you’ve got a design that makes you smile – now it’s time to decide what that design will actually live on. The material you pick changes the whole feel of the ornament, from a glossy, kid‑friendly vibe to a sleek, grown‑up sparkle.
Metal vs. Acrylic vs. Ceramic
Metal ornaments (often brushed aluminum or polished brass) feel sturdy and a bit upscale. They’re great for dads who love a modern look or teachers who want a durable keepsake that won’t chip in the classroom. Acrylic gives you that glass‑like shine without the fragility – perfect for moms who need something safe for a busy household with kids running around. Ceramic is the classic holiday‑season favorite; it’s heavy, warm, and works beautifully with matte or glossy finishes, which many nurses appreciate for a comforting, home‑y feel.
In our experience at TeninoVentures, we’ve seen metal sell best when the design uses bold lines and metallic colours, while acrylic shines with pastel palettes and intricate details.
Finishes that Matter
Once you’ve chosen a base material, think about the finish. A high‑gloss coat makes colours pop, but it also shows fingerprints – something to keep in mind if your target buyer is a busy parent. A matte finish hides smudges and gives a soft, tactile experience, which is a hit with teachers who love a subtle look on their desk. If you want that extra wow factor, consider a glitter or holographic overlay; it’s a cheap way to add that “wow” moment without raising the price too much.
Pro tip: order a single proof of each finish before you commit to a full run. The way a colour looks under a matte coat can be surprisingly muted compared to a glossy one.
Size Selection – Bigger Isn’t Always Better
Ornaments typically come in 2‑inch, 3‑inch, or 4‑inch diameters. A 2‑inch piece is perfect for a subtle name tag on a family tree, while a 4‑inch bauble makes a statement on a mantelpiece. Think about who will hang it: a teacher’s desk drawer might only have room for a 2‑inch charm, whereas a mom decorating a living‑room tree can easily accommodate a larger size.
We like to create a quick size matrix for each design:
- 2" – budget‑friendly, great for bulk orders or school fundraisers.
- 3" – the sweet spot for most families; visible enough without overwhelming the tree.
- 4" – ideal for limited‑edition runs or when you want the ornament to be the centerpiece.
Remember, larger ornaments cost a bit more to ship, so factor that into your pricing if you’re targeting Etsy shoppers.
Matching Material to Theme
Let’s say you’re making a stethoscope silhouette for nurses. A brushed metal base with a brushed‑silver finish echoes the look of real medical tools and feels professional. For a kid‑centric snow‑man design, acrylic in a glossy finish captures that shiny, icy feel without the risk of breakage.
Another example: a holiday quote on a ceramic ornament with a matte finish feels like a little piece of nostalgia – perfect for grandparents who love a classic look.
Practical Checklist
Before you hit “order proof,” run through this quick list:
- Pick the material that matches your audience’s lifestyle.
- Choose a finish that balances aesthetics and durability.
- Select a size that fits the intended display location.
- Order a single proof of each material/finish combo.
- Compare colour fidelity and texture on the physical sample.
And if you ever feel stuck about which finish to try first, our guide offers a handy rundown of finish options that translate well to ornaments. It’s not about mugs – the principles of colour depth and surface texture are the same.
Bottom line: the right material, finish, and size turn a cute design into a keepsake that people actually want to hang on their tree year after year. Take a few minutes now to sketch out your material matrix, order those proofs, and you’ll be one step closer to a holiday bestseller.
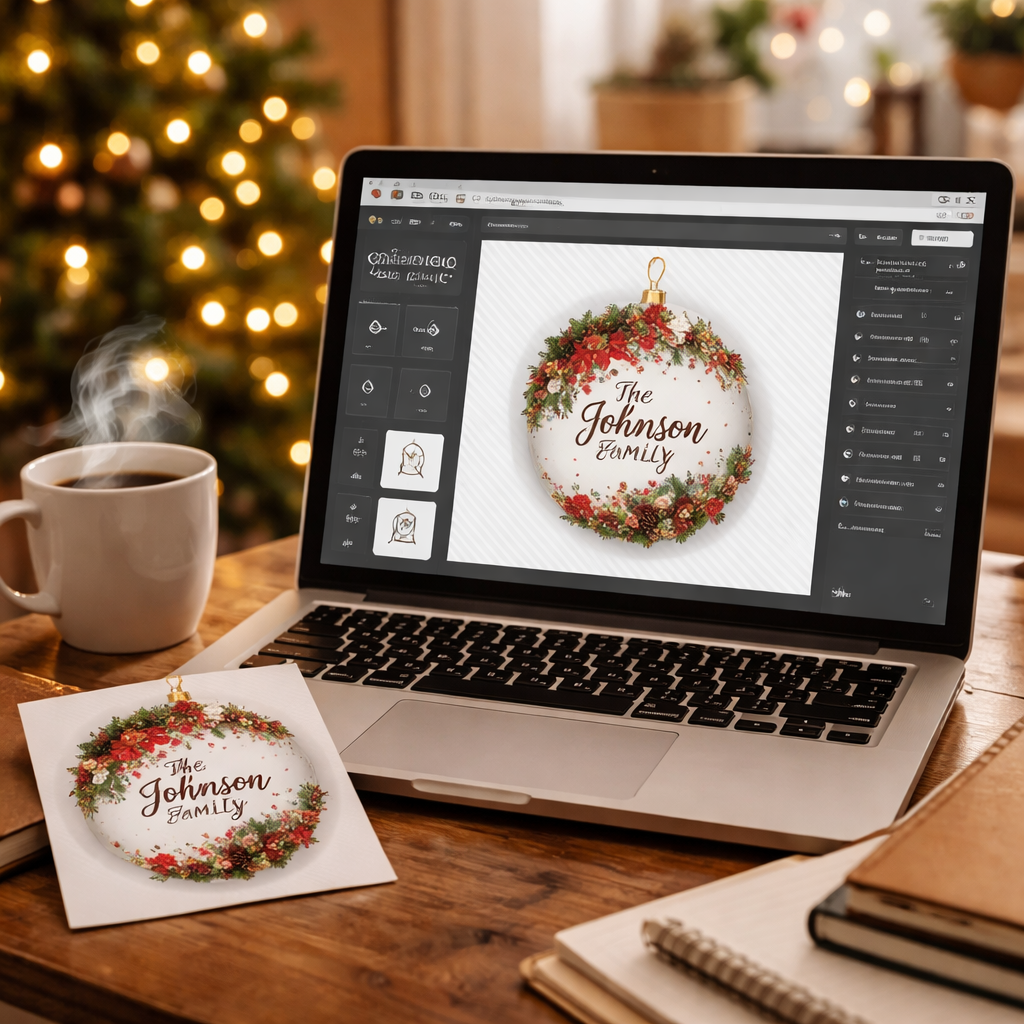
Step 4: Upload Designs and Place Your First Order
Alright, you’ve got your artwork polished, your material matrix sorted, and a proof sitting on your desk. The next move feels a bit like loading a sleigh with gifts – you want everything snug, secure, and ready to roll out.
1. Log into your POD dashboard
First thing’s first: fire up the platform you chose in Step 1. In our experience at TeninoVentures, a clean dashboard that lets you drag‑and‑drop your PNG makes the whole process feel less like a chore and more like a quick coffee break. If the interface feels clunky, it’s worth pausing – a smoother upload flow saves you time later.
2. Upload the right file
When you hit the “Upload” button, double‑check you’re sending the version with a transparent background and 300 dpi resolution. Naming the file something clear – for example snowman_acrylic_3in.png – helps you keep track when you later add variations for metal or matte finishes.
Tip: most platforms show a tiny preview right after you upload. Give it a once‑over to make sure the design isn’t shifted off‑center. A mis‑aligned image now means a mis‑aligned ornament later, and nobody wants that on a Christmas tree.
3. Choose material, finish, and size
Now you’ll see dropdowns for material (metal, acrylic, ceramic), finish (gloss, matte, glitter), and size (2", 3", 4"). Pick the combo that matches the audience you’re writing for – moms love safe acrylic gloss, teachers often go for matte ceramic, and nurses appreciate a sleek brushed‑metal look.
If you’re unsure, you can always start with a single proof of each major combo. It’s a tiny investment that pays off in confidence when the final product ships.
4. Add a product title and description
Keep the title concise but searchable: “Custom Snow‑Man Acrylic Ornament – 3‑inch Gloss”. In the description, weave a short story – “Designed during a rainy Saturday craft session, this ornament captures the magic of a child’s first snowman.” That human touch nudges buyers from scrolling to clicking.
Don’t forget to embed our guide on finish options for a quick reference – it explains why a matte coat hides fingerprints better than gloss, which can be a game‑changer for busy parents learn more about finish options here.
5. Set pricing and inventory
Because it’s print‑on‑demand, you don’t need to stock inventory, but you do need to set a price that covers the base cost, shipping, and a modest profit. A good rule of thumb: add 30‑40% on top of the provider’s cost. If you’re offering bulk discounts for teachers ordering a class set, note that in the “Variations” section.
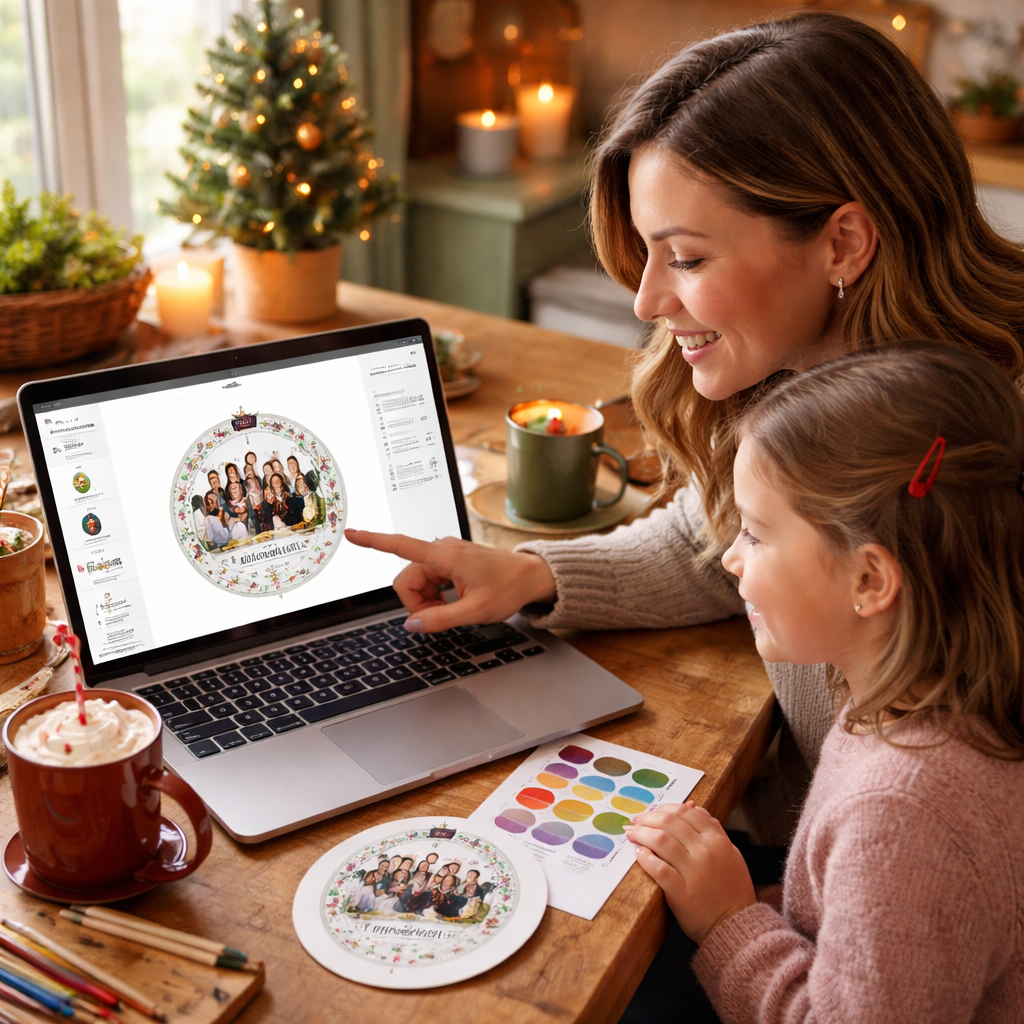
6. Order your first proof
Before the listing goes live, click “Order Sample” or “Request Proof”. This is the moment you see colour fidelity, finish texture, and how the design wraps around the curve. When the sample arrives, inspect it under natural light, compare it to your screen mock‑up, and make any tiny tweaks – maybe shift a snow‑flake a millimetre or adjust a hue that looks too pale.
Pro tip: keep a photo of the proof next to your digital mock‑up. When you upload product images to Etsy later, you’ll have a real‑world shot that shows exactly what customers will receive.
7. Hit “Publish” and watch the orders roll in
Once the proof passes your sanity check, hit “Publish” or “List”. Your ornament is now live on your shop, ready for a busy holiday season. Celebrate the little win – you’ve just turned a sketch into a sellable product without ever touching inventory.
So, what’s the next step? Grab that first proof, compare it to your screen, make any final tweaks, and then let the world see your custom Christmas ornament. The whole process takes a weekend, and you’ll have a product ready to ship as soon as the first order clicks “Add to cart”.
Step 5: Market Your Custom Ornaments and Drive Holiday Sales
So you’ve got the proofs, the listings, and the vibe. Now the real work begins: getting eyes on your custom Christmas ornament print on demand offerings. Let’s keep it practical, friendly, and doable for a busy mom, dad, teacher, or nurse this holiday season.
Know your audience and tailor offers
Start with who you’re selling to. For Moms, a keepsake that celebrates a child’s milestone lands best when it feels personal, easy to gift, and shipped in time for family gifts. Dads appreciate modern designs that feel sturdy and gift-ready. Teachers respond to fundraisers and classroom motifs that align with school spirit. Nurses often love keepsakes that honour care and teamwork. Write your product story with those moments in mind.
In our experience, simple backstories matter as much as the design. Add a short note in the listing about why this ornament mattered to you or a family you know. It’s tiny, but it builds trust and conjures memory before the customer even clicks buy.
Craft listings that tell a story
Your listing photos should show the ornament on a real tree, not a flat mock‑up. Pair the image with a crisp, concise description that mentions the materials and finish, but lead with the emotion: “Designed during a cozy weekend with grandma, this snowman ornament captures a family’s first snow day.”
Use your first few lines to answer the buyer’s unspoken questions: size, how to clean, what the gift packaging looks like, and when it ships. This section directly feeds Etsy's search results, so weave in natural keywords around “custom Christmas ornament print on demand” without stuffing.
Pricing, bundles, and incentives
Think like a buyer. A 3‑inch acrylic gloss ornament might sit at a price point of around $19–$25 depending on material. If you’re targeting classrooms or nurse groups, offer small bundles: three ornaments for a discounted price and reduced shipping for orders of 10+.
Set clear variations for sizes and finishes so buyers can see the options at a glance. Also consider limited edition runs to create urgency. In our experience, limited quantities paired with a personal note on the listing boost conversions.
Marketing channels that actually move product
Social media is your friend here. Short videos showing the design process or a quick tree‑decorating setup can spark gifting ideas. Etsy promotions, email newsletters to teacher groups, and local fundraiser events can drive steady orders without feeling pushy. And yes, timing matters: launch early enough for holiday ship windows and remind customers of deadlines as December approaches.
Want more practical POD marketing ideas? Boho Tote Bag Print on Demand: 6 Essential Tips to Boost Sales has tactics you can adapt for ornaments — it’s a solid read if you’re looking for repeatable growth. Boho Tote Bag Print on Demand: 6 Essential Tips to Boost Sales.
So, what should you do next? Pick one channel to test this weekend—Instagram reels, a short Etsy promo, or a local school fundraiser—and measure the lift in clicks and saves. If you treat this as a small, repeatable system, you’ll build momentum without burning out.
Step 6: Pricing, Profit Margins, and a Quick Comparison Table
Okay, you’ve got your design nailed, the material picked, and the proof sitting on your desk. Now the real question is – how do you turn those costs into a profit without scaring away Mom‑buyers or busy Nurse‑shoppers?
First, take a breath. Pricing feels like a math puzzle, but it’s really just a conversation between you and the person who’s about to hang your ornament on their tree.
What’s the baseline?
Every POD provider shows you a “base cost” – that’s what the manufacturer charges you for one finished ornament, shipping included. In our experience at TeninoVentures the numbers usually sit between $8 and $12 for a 3‑inch piece, depending on material and finish.
Tip: always pull the latest cost sheet from your POD dashboard before you set a price. Costs can shift after holidays or when a new material rolls out.
Adding your margin
Most creators aim for a 30‑40% markup on top of the base cost. Why? It covers your time (design, photography, listing), Etsy fees (about 6.5% plus payment processing), and still leaves room for a happy profit.
Let’s walk through a quick example. If the base cost for a glossy acrylic ornament is $8.50, add a 35% markup – that’s roughly $3.00. Then tack on $1.70 for Etsy fees. You land at a $13.20 price floor. Most shoppers are comfortable with $20‑$25 for a personalised bauble, so you have wiggle room for bundles or holiday discounts.
Bulk discounts – the teacher and nurse angle
Teachers love bulk orders for class fundraisers, and nurses often buy sets for whole departments. Offer a tiered discount: 5% off 10‑plus, 10% off 20‑plus. The math stays simple because the discount is applied after your base markup, preserving your margin.
And remember, you can still keep the “limited‑edition” vibe by capping the total number of discounted sets. It creates urgency without turning the price‑game into a race to the bottom.
Shipping considerations
Shipping costs are baked into the base cost on most POD platforms, but double‑check the weight. A heavier metal ornament will push the shipping price up a few dollars – that extra cost should be reflected in your retail price.
Pro tip: include “Free shipping on orders $30+” in your listing. It nudges buyers to add a second ornament, which boosts average order value and your overall profit.
Psychology of price points
People tend to gravitate toward round numbers that end in .99 or .95. A $24.95 price feels like a better deal than $25, even though the difference is tiny. Use that to your advantage, especially when you’re targeting price‑sensitive parents.
And don’t forget to test. Change the price by $1 or $2 for a week, watch the conversion rate, and adjust accordingly. Small tweaks can lead to big gains.
Quick reference table
| Material | Base Cost (USD) | Suggested Retail | Profit Margin |
|---|---|---|---|
| Acrylic Gloss 3" | $8.50 | $22 | ~62% |
| Metal Brushed 3" | $10.00 | $26 | ~62% |
| Ceramic Matte 3" | $9.00 | $24 | ~63% |
That table gives you a snapshot you can paste into your Etsy pricing calculator. Adjust the numbers as your POD provider updates their rates.
Actionable checklist
- Grab the latest base‑cost sheet from your POD dashboard.
- Apply a 35% markup, then add Etsy fees.
- Set a retail price that lands in the $20‑$30 range for single pieces.
- Create tiered bulk discounts for 10+ and 20+ orders.
- Test price variations for two weeks and track conversion.
- Use the comparison table to keep your numbers front‑and‑center.
If you’re looking for more detailed guidance on how to structure POD pricing, check out this article on pricing tips for POD products. It walks through the same math but with coffee mugs as an example – the principles translate perfectly to ornaments.
So, what’s the next move? Pull your cost sheet, plug the numbers into the table above, and set a price you feel good about. Then watch the orders roll in and adjust as you learn what your audience is willing to pay. Happy pricing!
FAQ
What is a custom Christmas ornament print on demand and how does it work?
Custom Christmas ornament print on demand lets you upload a design and have a POD provider turn it into a finished bauble only when someone orders it. You don’t hold inventory; the printer prints, adds any personalization, packages and ships directly to the buyer. For busy mums or teachers, this means you can test a single design over a weekend, see real sales, and scale without upfront costs.
How long does it take to get a proof and start selling?
Most POD services promise a 2–3 business‑day turnaround for a single proof once you’ve uploaded a print‑ready PNG. In our experience, ordering the proof early in the season gives you a buffer to tweak colours or bleed before the holiday rush. After the proof arrives, you can publish the listing within an hour – just add photos, a short story and the price, then hit ‘publish’.
What file specifications should I use for a high‑quality ornament?
Export your artwork as a PNG with a transparent background, at least 200 dpi for the final size (400 × 400 px for a 2‑inch bauble). Keep the colour space in sRGB, then toggle a CMYK preview if your tool offers it and adjust any washed‑out tones. Add a 3 mm bleed around every edge so the printer can trim without leaving a white line.
Can I offer personalisation and how should I price it?
Yes – adding a name, date or tiny icon is the fastest way to boost perceived value. Charge a flat £2–£3 extra for each line of text; most shoppers are willing to pay that for a keepsake that feels unique. Test two price points – one with the base ornament only and one with the personalised add‑on – and compare conversion rates after a week.
What are the best ways to showcase my ornament on Etsy?
Use a high‑resolution mock‑up that shows the bauble hanging on a real tree, plus a close‑up of the personalised area. Include a lifestyle photo – maybe a coffee table with a cup of tea and the ornament in the background – to help shoppers visualise it in their home. Write a short, heartfelt description that starts with the keyword and tells the story behind the design.
Do I need to order a sample before listing, and why?
Ordering a single proof is cheap compared with a batch that could end up with colour shifts or a visible white line. When the sample arrives, check the colour fidelity, the smoothness of the edge and that the personalised text isn’t clipped. A quick tweak now saves you from negative reviews later and keeps your shop’s rating high.
How do I handle shipping and returns for custom ornaments?
Because each piece is made to order, ship it via a tracked service that includes insurance for fragile items – most POD providers bundle this for you. Clearly state a 14‑day return window for damaged or misprinted ornaments, but note that personalised items can’t be returned for buyer’s remorse. Offer a replacement or a discount on the next purchase to keep customers happy.
Conclusion
We've walked through everything you need to turn a simple idea into a polished custom Christmas ornament print on demand that sells.
First, remember the three non‑negotiables: a high‑resolution PNG with transparency, a 3 mm bleed, and a quick CMYK preview. Nail those and the printer will handle the rest.
Second, pick the material that matches your audience – acrylic for busy mums and dads, metal for teachers or nurses who want a keepsake that feels like jewellery.
Third, always order a proof. A cheap sample catches colour shifts, edge issues, or clipping before you list the product, saving you headaches and negative reviews.
Key takeaways
✔️ Keep your file at ≥ 200 dpi, add bleed, and double‑check transparency.
✔️ Match material to the buyer’s lifestyle and safety needs.
✔️ Use a proof to fine‑tune colour and edge quality.
✔️ Write a short, story‑driven description that starts with the keyword and tells why the ornament matters.
Now it’s time to upload your design, place that first proof order, and watch your ornament find a spot on someone’s tree this holiday season. Remember, every detail you perfect now pays off when the ornament shines under the lights. Got a question or need a quick tip? Drop us a line – we love helping mums, dads, teachers and nurses bring their ideas to life at TeninoVentures.
Leave a comment
This site is protected by hCaptcha and the hCaptcha Privacy Policy and Terms of Service apply.