
Creative Halloween t-shirt print on demand ideas to boost sales
Ever caught yourself scrolling past a sea of boring Halloween tees and thinking, “There has to be something more fun than the same old pumpkins?”
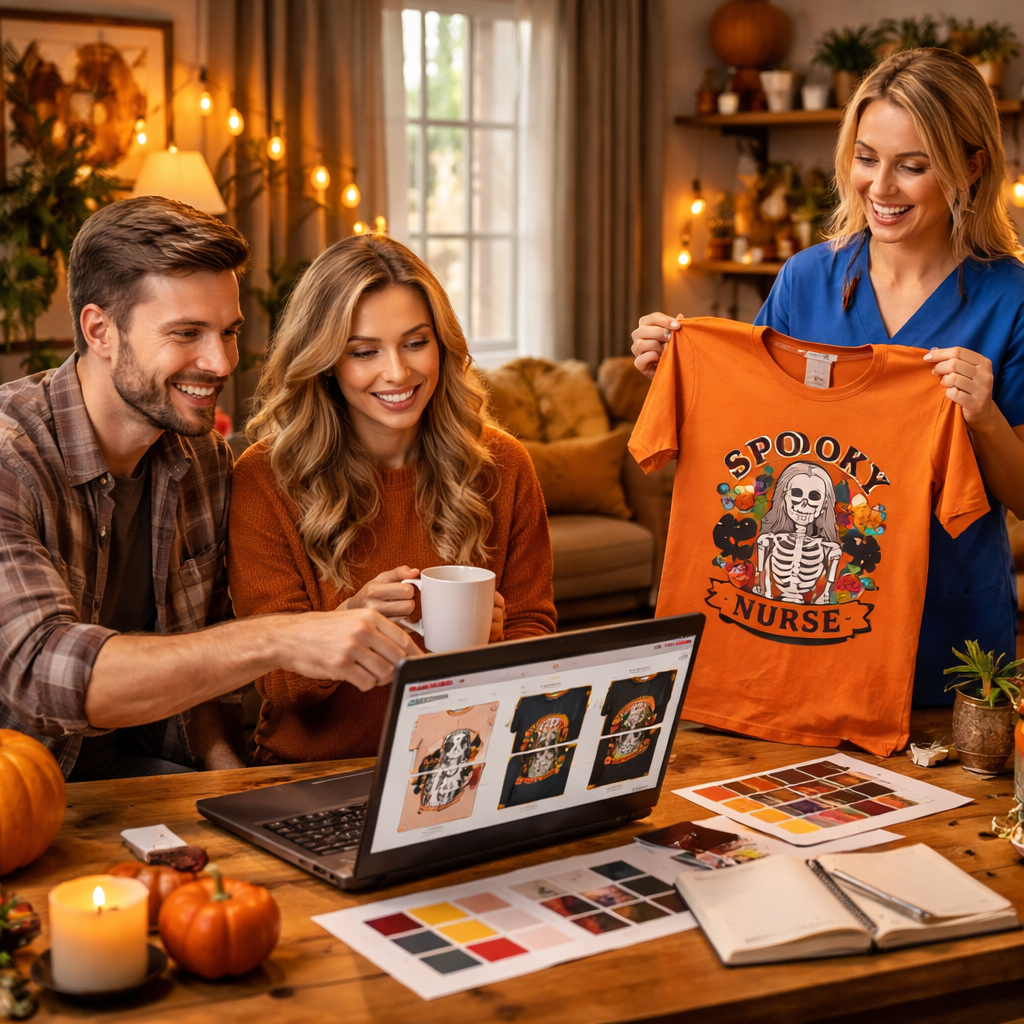
We feel you. As moms juggling bedtime stories, dads hunting the perfect costume for the kids, teachers planning spooky classroom décor, and nurses pulling all‑night shifts, you need a shirt that screams personality without costing a fortune.
That’s where Halloween t‑shirt print on demand steps in. Instead of ordering a bulk batch you’ll never wear again, you can design a single shirt (or a handful) that matches your vibe, have it printed only when someone orders, and ship it straight to the door.
Picture this: a witty “I’m only here for the candy” graphic on a soft cotton tee, ready for the school’s pumpkin parade, or a subtle “Night shift survivor” design for the nurses’ Halloween party. No inventory headaches, no wasted fabric, just instant creativity.
In our experience, the biggest hurdle isn’t the design itself—it’s knowing which POD platform gives the best quality print, fast turnaround, and reliable shipping for busy families. We’ve seen a simple mock‑up turn into a bestseller when the colours stay vivid after wash and the shirt feels comfortable enough for a full day of trick‑or‑treating.
So, what’s the secret sauce? Start with a clear theme that resonates with your audience, use high‑contrast artwork that pops on dark fabric, and keep the copy short but punchy. Add a little seasonal flair—think glow‑in‑the‑dark ink or a hidden “boo” inside the collar—and you’ve got a shirt that people actually want to wear.
Ready to dive deeper? We’ll walk you through picking the right POD partner, crafting eye‑catching designs, and pricing your shirt so it’s a win for both you and your customers.
Grab your favorite design tool now, and let the Halloween magic start.
TL;DR
Designing a Halloween t‑shirt print on demand is a quick way for moms, dads, teachers and nurses to create spooky, personalised gear without inventory hassles. Choose a reliable POD partner, use bold high‑contrast artwork, and launch your custom shirts fast so you can start selling before the pumpkins even appear.
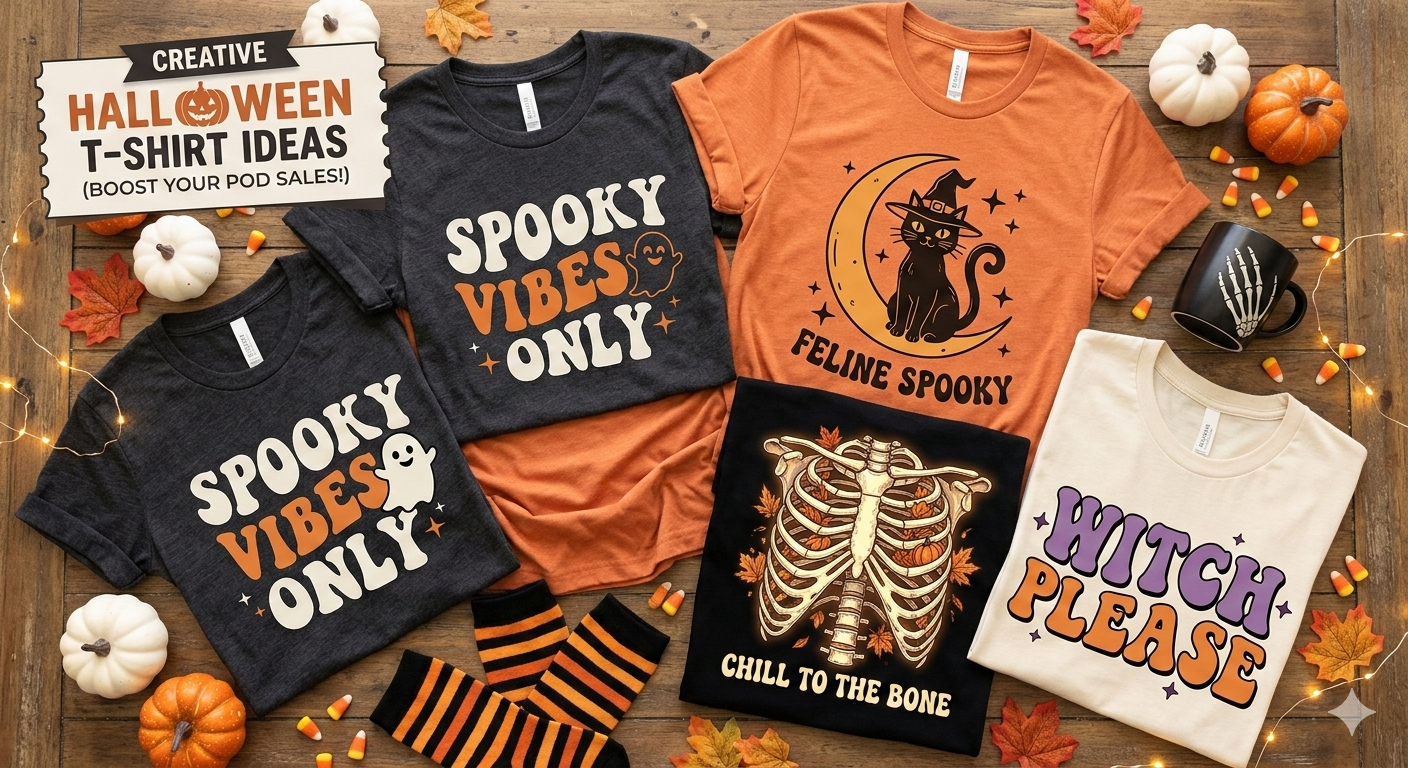
Design Idea #1: Spooky Classic Graphics
Halloween t-shirt print on demand isn't about chasing fads; it's about timeless, legible graphics that people actually wear to work, school, or a shift. You want something that reads from across the room, not something that requires a close study. That's where spooky classics shine: bold lines, crisp shapes, and a little nostalgia that makes people smile.
In our experience with POD for families and frontline workers, simple, iconic imagery beats busy scenes on dark fabrics. A ghost with a thick outline, a retro pumpkin, or a friendly skeleton can look festival-ready on black or navy tees without crowding the print.
1) Keep it simple and iconic
When you design for print on demand, fewer details actually help your shirt read from a distance. Think chunky shapes, big eyes, and a single focal element—the kind of graphic that snaps when someone is standing in line for Halloween candy. Our advice: start with a single icon and add one supporting element, not the whole scene.
2) Maximize contrast on dark fabrics
High-contrast designs pop on dark shirts. Use white or bright colors for the main graphic and reserve pastel or midtones for accents. This makes the artwork breathe and reduces the chance of muddy prints after washing. For moms and dads rushing between school runs and trick-or-treat routes, the payoff is a tee that stays legible all night long.
3) Add a subtle glow or hidden detail
Glow-in-the-dark ink or a tiny hidden message tucked inside a collar can turn a simple graphic into a conversation starter. It feels special without complicating production. And yes, you can tease a little "boo" without shouting it from the rooftops—sometimes restraint makes the moment hit harder.
So, what should you do next? Scout bold, simple silhouettes and test on a few dark fabric colors. Print-on-demand means you can experiment with a couple of variants without breaking the bank.
Does this approach really translate to sales? In our experience, yes—clear graphics with strong contrast tend to convert screenshots, social posts, and classroom chatter into actual orders. The key is to stay true to the audience: busy moms, hardworking dads, teachers planning spooky lessons, and nurses grabbing a quick shift shirt between rounds. The more relevant the theme (think a playful “Night shift survivor” style on a dark tee), the more people will want to wear it.
4) Match designs to the work lives of our audience
Consider themes that fit your buyers' daily routines. A nurse-friendly ghost on navy scrubs-style tees, or a classroom-friendly pumpkin on heather gray can feel both festive and practical. TeninoVentures has found that the strongest sellers blend humor with a touch of professional pride—enough to spark a smile without clashing with a uniform policy. We love that flexibility; it makes the whole process feel accessible rather than intimidating.
There you have it—Spooky Classic Graphics that work in the real world. If you want, we can help you pick the right colorways, set up mockups, and test prints so your next Halloween line is both profitable and loved by your community.
Design Idea #2: Retro Halloween Vibes
Remember that feeling when you stumble on an old Halloween postcard from the 1970s – the grainy colours, the funky type, the way the ghosts look like they belong on a vinyl record sleeve? That nostalgic buzz is exactly what you can bottle into a t‑shirt, and it works especially well for busy moms, dads, teachers and night‑shift nurses who love a little throwback flair without the DIY hassle.
Retro Halloween isn’t just about slapping a neon pumpkin on a shirt. It’s about dialing back the visual language to the era when Halloween parties were hosted in living‑room basements, complete with lava lamps and psychedelic prints. The key is to keep the vibe playful, not cheesy, so the design feels fresh even after a dozen washes.
Dig into the colour palette
Start with the muted, slightly washed‑out hues that defined the ’70s – think burnt orange, avocado green, mustard yellow and a touch of dusty teal. Pair a deep navy or charcoal base with those accents and you’ve got a backdrop that lets the retro elements pop without shouting.
Tip: use a single neon accent (like electric orange) for the eyes of a skull or the glow of a moon. That one‑pop colour catches the eye on social media feeds and still reads well on fabric.
Typography that screams the ‘70s
Pick a font that looks like it was pulled from a vintage concert poster – bold, rounded, a little wobble at the ends. Fonts like “Cooper Black” or “ITC Avant Garde” instantly whisper retro, especially when you set them in all caps with a slight arc.
Don’t over‑load the shirt with text. A short phrase like “Spooktacular ’76” or “Ghoul Vibes Only” works better than a paragraph. Let the type be the centerpiece, not the filler.
Retro graphics you can remix
Classic motifs – think stylised cassette tapes, lava‑lamp ghosts, or a groovy moon with starbursts – can be re‑imagined for Halloween. Swap a cassette tape’s label for a tiny pumpkin, or replace the lava swirl with a curling orange mist.
Because you’re printing on demand, you can experiment with colour‑inverted versions for dark tees versus light tees without committing to a big inventory. Play with a halftone texture to give the design that slightly grainy, printed‑on‑paper feel.
Putting it together for each audience
For moms, imagine a soft heather‑grey tee with a pastel‑washed cassette‑ghost and the tagline “Mom’s Midnight Mix”. It’s subtle enough for a school pickup line but still hints at the retro party vibe.
Dads love a bold statement – picture a navy tee with a neon‑outlined skull wearing a pair of oversized sunglasses, captioned “Retro Reaper”. It feels like a throwback concert tee you’d wear to a backyard BBQ after the kids have gone to bed.
Teachers can lean into the classroom‑friendly angle: a muted teal shirt with a chalk‑style “Boo‑ology 101” banner and a tiny retro pumpkin doodle in the corner. It’s a conversation starter for a Halloween lesson plan.
Nurses on the night shift might appreciate a charcoal tee with a simple, slightly distressed “Ghost Duty” badge in avocado green, paired with a faint, vintage‑style pulse line forming a bat silhouette. It’s low‑key but instantly recognisable to fellow staff.
Production tips for a crisp retro finish
When you upload your artwork, keep the file at 300 dpi and use a PNG with a transparent background. Most POD platforms, including TeninoVentures, suggest an sRGB colour profile – it ensures those muted ’70s tones don’t shift to garish neon during printing.
Consider a slightly textured ink finish for the halftone elements; it mimics the look of old screen‑printed posters and adds a tactile surprise when you run your fingers over the design.
If you want an extra wow factor, try a subtle glow‑in‑the‑dark ink on the moon or the eyes of a ghost. It’s a small cost addition that makes the retro vibe feel magical after the lights go out.
Ready to start sketching? Our print‑on‑demand design basics guide walks you through file prep, colour choices and how to preview your tee before it goes live. Grab your favorite design tool, mix those vintage colours, and let the retro Halloween vibes take over your next POD collection.
Design Idea #3: Funny Pumpkin Puns
Ever stared at a blank canvas and thought, “How can I make a pumpkin say something that actually makes people laugh?” You’re not alone. Funny pumpkin puns are the low‑effort, high‑giggle shortcut that turns a basic Halloween tee into a conversation starter.
Why puns work so well on shirts
Puns combine visual and verbal humour in one bite‑size package. A clever line paired with a simple pumpkin illustration grabs attention in a split second – perfect for busy moms juggling bedtime stories, dads hunting candy, teachers grading papers, or nurses on night shift who only have a few seconds between patients.
And because the joke is self‑contained, you don’t need a lot of space. That means the design stays crisp even on a small chest print, and the colours stay bold after wash cycles.
Pick a pumpkin that can talk
Start with a recognizable pumpkin silhouette – round, slightly jagged, maybe a tiny stem peeking out. Then give it a voice with a short phrase. Here are a few crowd‑pleasers we’ve seen work:
- “I’m just here for the gourd‑geous vibes.”
- “Don’t be a squash, enjoy the night.”
- “Feeling gourd‑geous today?”
- “Pumpkin spice and everything nice… except the candy tax.”
Notice the rhythm? Short, snappy, and easy to read at a glance. If you’re designing for teachers, you could add a chalk‑board texture behind the text – it feels like a classroom blackboard without being too literal.
Colour tricks that make the pun pop
Use a dark base – charcoal, navy, or deep forest green – then let the pumpkin itself be a bright orange or neon pumpkin‑pink. The contrast makes the words pop like a punchline. A thin white outline around the text helps readability on both light and dark fabrics.
We’ve also experimented with a subtle glow‑in‑the‑dark ink on the pumpkin’s eyes. The effect? Kids love it, and nurses get a quiet chuckle when the lights dim on a night‑shift break room.
Layer in a tiny visual gag
Think of a secondary detail that reinforces the joke. For “I’m just here for the gourd‑geous vibes,” add a tiny pair of sunglasses perched on the pumpkin’s nose. For “Don’t be a squash,” draw a tiny, cartoonish squash rolling away.
These micro‑elements reward a closer look and make the shirt feel more thoughtful – something busy parents appreciate when they’re scanning a rack of Halloween merch.
Technical checklist for a clean POD print
1. Set your artwork to 300 dpi. 2. Save as a PNG with a transparent background. 3. Use the sRGB colour profile – most platforms, including TeninoVentures, default to this for accurate shades. 4. Keep the colour palette to three main colours to avoid banding on cheaper tees. 5. Test a draft on plain paper; if the text looks fuzzy, thicken it by 1‑2 px.
And if you want to go the extra mile, add a soft‑touch ink finish on the pumpkin’s curve – it feels like a little bump when you run your fingers over the design.
Real‑world scenario
Picture a dad who’s the unofficial “funny guy” at his kids’ school. He orders a tee that says “Pumpkin spice and everything nice… except the candy tax” with a mischievous pumpkin holding a tiny candy‑wrapped tax form. He wears it to the school’s pumpkin parade, gets a few laughs, and the school’s PTA orders a batch for their staff fundraiser. The design sells out fast because the joke is instantly relatable.
Where to find more funny‑design inspiration
If you need a deeper dive into crafting witty graphics that convert, check out our funny design tips guide. It walks you through brainstorming punchlines, choosing the right font, and testing readability before you hit “publish”.
Quick start checklist
• Choose a simple pumpkin outline. • Brainstorm 3‑5 one‑liners. • Pick a high‑contrast colour combo. • Add a tiny visual gag. • Follow the 300 dpi PNG workflow. • Preview on a mock‑up, then launch.
That’s it. A funny pumpkin pun can turn a generic Halloween tee into a bestseller, and with print‑on‑demand you only produce what your audience actually wants to wear. So grab your favourite design tool, let the puns flow, and watch the smiles roll in.
Design Idea #4: Glow-in-the-Dark Creations
Let’s be real: Halloween tees that glow in the dark bring that extra spark families crave. Kids notice, parents smile, and nurses on night shifts appreciate something playful that still feels thoughtful. In our experience with Halloween t-shirt print on demand, glow inks turn simple silhouettes into keepsakes.
Why glow matters: it’s a slow-bloom surprise that appears when the lights go down, nudging your design from nice to wow. It’s not about gimmicks; it’s about mood—a moonlit glow behind a haunted house, eyes that shine with friendly mischief, or a pumpkin that comes alive in the dark. And because POD lets you test small runs, you can try one glow print and watch what happens.
Choose the right base and contrast
Navy, charcoal, and deep greens behave best on dark fabrics, letting the glow pop without fighting for attention. For light tees, a bold white or neon lime glow can still read clearly when the room dims.
- Keep your glow areas compact. A few key accents read cleaner and wash better than full-sleeve glow blankets.
- Pair glow with a crisp outline in black or white to maintain legibility.
- Test on a few fabrics. Glow on cotton feels different from polyester blends.
Glow techniques to experiment with
Use a glow-in-the-Dark ink sparingly for the eyes, moon, or a tiny punctuation mark. Layer glow ink over a flat print to create a subtle halo around a pumpkin. If your budget allows, try a second pass with a soft-touch finish on the glow areas for a tactile surprise.
Consider a two-tone approach: a matte base graphic plus a glow-in-the-Dark accent that only reveals itself after dark. It keeps the design readable by day and magical after sunset.
Production tips for POD success
Upload at 300 dpi, PNG with transparent background, and use sRGB. We’ve seen glow prints last well through dozens of washes when the design is crisp and the ink is correctly aligned to the print area.
For reliability, order a test cut. Does the glow read at a comfortable distance? Is it still vibrant after your first wash? These checks save you from surprise returns later.
Make it moment-driven for different audiences
Moms can sport a glow-accented “Boo-tiful Night, Busy Morning” tee that’s still kid-friendly. Dads might opt for a glow-accented “Trick-or-Treat Captain” design. Teachers can light up a “Spooky Science” motif with glow eyes peeking from a chalkboard, while night-shift nurses get a discreet glow badge that only peers notice.
So, what should you try next? Pick one glow element, test a couple of base colors, and then run a small batch. Glow prints are shareable on social when the visuals pop in dim lighting.
Want more practical design tips for POD? Minimalist Phone Case Print on Demand: A Practical Guide for Creators provides additional guidance on clean lines, color selection, and testing.
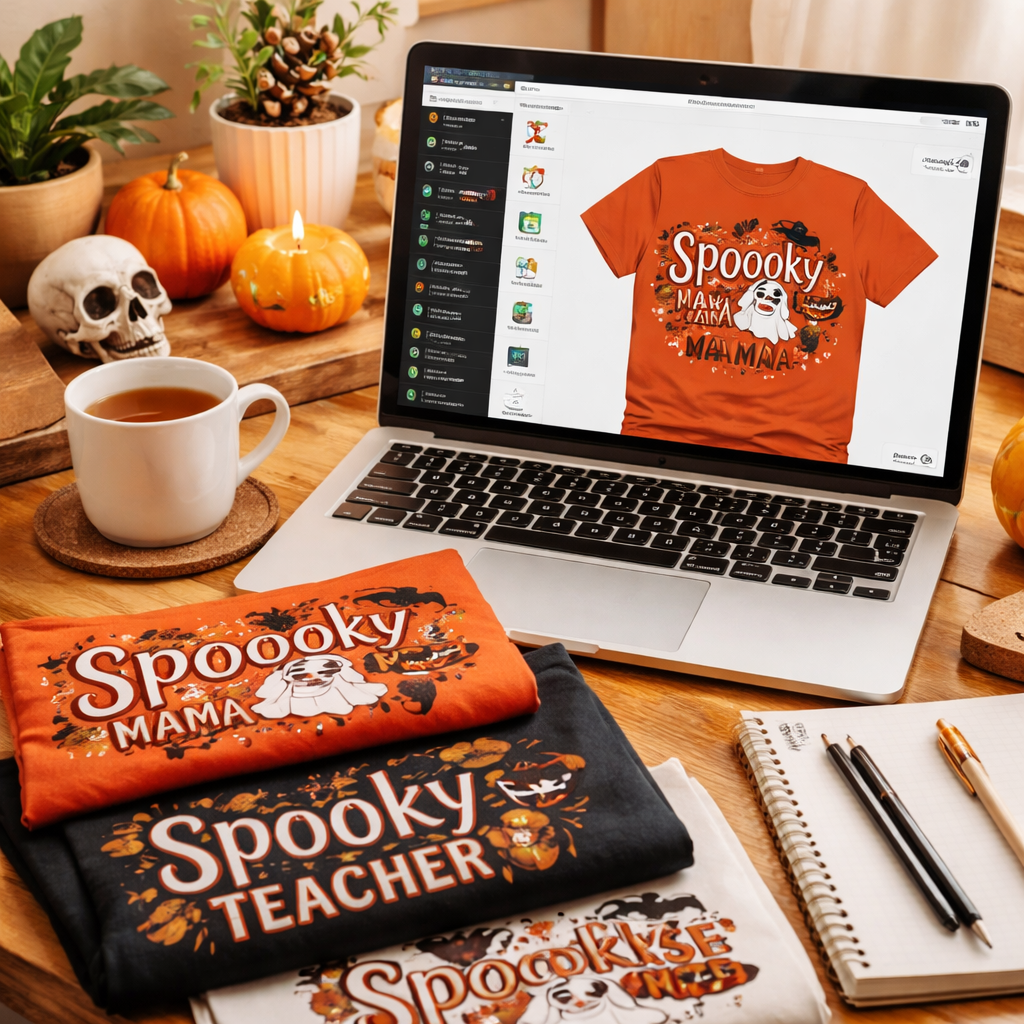
Design Idea #5: Customizable Templates
Ever wish you could give every family member a tiny say in the design without starting from scratch each time? That's the magic of customizable templates – a base layout you can tweak with names, colours, or tiny graphics, and still keep production costs low.
Imagine a dad who wants his "Spooky Dad" tee, a mom who prefers a softer "Pumpkin Mom" version, and a teacher who needs a "Classroom Ghost" spin. With a template, you swap out the text, maybe change the accent colour, and you’ve got three ready‑to‑sell shirts in minutes.
So, why do templates work so well for Halloween t‑shirt print on demand? First, they shave the design time down to seconds. Second, they let you test dozens of variations without paying for a new file each round. Third, they keep your POD partner happy – fewer file uploads means fewer chances for a mis‑print.
How to build a solid template
1. Start with a strong silhouette. A simple bat, a moon, or a pumpkin outline works as the visual anchor. Keep the lines bold – they’ll survive both screen‑printing and DTG.
2. Design placeholder text fields. Use a clear label like "[NAME]" or "[ROLE]" in a legible font. When you generate a specific version, just replace the brackets.
3. Pick a limited colour palette. Two to three hues keep ink costs down and make colour‑swaps easier. For Halloween, black, orange, and a neon accent are a safe bet.
4. Save separate layers for optional graphics. A tiny candy icon or a stethoscope can be toggled on for nurses or kids without re‑drawing the whole design.
5. Export in a print‑ready format. A 300 dpi PNG with a transparent background works for most POD services.
Real‑world examples that sold
Mom’s family match‑up. Sarah used a pumpkin‑template, swapped "Mom", "Dad", and "Kid" text, and changed the orange accent to teal for the kids. The family posted a photo on Instagram, and orders spiked by 40 % the next week.
Teacher’s classroom crew. Mr. Liu kept the same ghost silhouette but swapped the word "Ghost" for each class year – "Ghost 2024", "Ghost 2025" – and offered them as class‑spirit shirts. The easy tweak meant he could launch a new batch each semester without extra design work.
Nurse’s night‑shift badge. Jenna used a basic stethoscope outline, added a "Night Shift" banner, and changed the glow‑in‑the‑dark colour for the night‑shift crew. Because the template was ready, she ordered a batch in under an hour before the hospital’s Halloween party.
Actionable steps to launch your own template
• Pick a base design. Open your favourite design app – Canva, Photoshop, or the free GIMP – and create a 12 × 12 inch canvas.
• Insert placeholders. Type "[NAME]" where you want the custom text. Choose a font that stays readable at small sizes.
• Set up colour swatches. Save your palette as global colours so you can switch them with one click.
• Export a master file. Keep this untouched version as your master template.
• Generate variants. Duplicate the master, replace the placeholder text, adjust the accent colour, and export each as its own PNG.
• Order a sample. Before you publish, order a single shirt from a POD partner (Printful offers a range of Halloween‑ready tees). Check that the text stays crisp and the colours match your screen.
• Publish and promote. Upload each variant to your shop, tag them with the appropriate audience – "Mom", "Dad", "Teacher", "Nurse" – and let shoppers pick their favourite.
Tip: If you want to keep things tidy, bundle the template variations into a single product listing with colour/size options. That way you only manage one SKU, but customers still see the personalised options.
And remember, you don’t have to reinvent the wheel each year. Re‑use the same template for next Halloween, just tweak the text or add a new accent colour. It’s a sustainable way to keep your catalogue fresh without extra design cost.
For a deeper dive into how to maximise sales with reusable assets, check out our guide on Boho Tote Bag Print on Demand: 6 Essential Tips to Boost Sales. The principles of template efficiency apply across product types.
Ready to give your customers the power to personalise without the headache? Sketch that simple silhouette, set up your placeholders, and watch the orders roll in – one custom tweak at a time.
Design Idea #6: Niche Themes & Trends
Why niche matters more than ever
Ever feel like every Halloween tee looks the same until you spot that one design that actually speaks to your world? That’s the power of a niche theme – it cuts through the noise and makes the shirt feel personal, not generic.
For moms juggling bedtime stories, dads hunting the perfect costume, teachers planning a spooky lesson, or nurses pulling all‑night shifts, a design that nods to your specific hustle feels like it was made just for you.
Spotting the sweet‑spot trends
Here are a few trends that have been gaining traction in 2026 and work like a charm on a Halloween t‑shirt print on demand:
- Pet‑centric spooks – think a cat wearing a witch hat or a dog with a tiny pumpkin bucket.
- Pop‑culture mash‑ups – a classic monster silhouette paired with a trending meme phrase.
- Sustainable‑styled graphics – earth‑tone palettes, recycled‑paper texture effects, or a tiny “eco‑boo” badge.
- Local landmark haunts – silhouettes of famous city skylines with a ghost hovering over them.
Each of these can be tweaked for our core audiences. A teacher could get a “Science Lab Specter” with a beaker‑shaped ghost, while a nurse might love a “Night‑Shift Nightingale” design featuring a stethoscope‑wrapped bat.
Quick‑fire idea generator
Grab a notebook and answer these three questions – you’ll have a ready‑to‑use niche in under a minute:
- What hobby or daily ritual defines your buyer? (e.g., morning coffee, bedtime storytime)
- Which Halloween icon can you remix to fit that ritual? (e.g., pumpkin, ghost, black cat)
- What colour or texture will make it pop on a dark tee?
Plug the answers together and you’ve got a concept like “Coffee‑Lover Ghost” – a steaming mug ghost that only appears when the lights dim.
Design tips that keep the niche crisp
- Limit the colour palette. Two to three colours keep printing costs low and ensure the design stays vivid after wash cycles.
- Use clear hierarchy. Let the niche element (the cat, the landmark) dominate, then add a subtle text hook beneath.
- Test on mock‑ups. Place the design on both charcoal and heather‑grey tees – you’ll see instantly which background lets the niche shine.
And remember: a little texture, like a faux‑fabric pattern behind the ghost, can make a simple niche feel premium without extra ink.
Real‑world niche wins
Picture a dad who’s also a weekend gardener. He orders a tee that shows a pumpkin sprouting vines, with the caption “Rooted in Spook”. The design sells at the local farmer’s market because it mirrors his hobby and the holiday.
Now imagine a teacher who loves vintage comics. A “Comic‑Panel Specter” tee – a split‑frame ghost with speech bubbles – becomes the class’s unofficial mascot for the Halloween reading week.
Table: Quick niche‑theme checklist
| Audience | Niche Theme | Design Hook | Print Tip |
|---|---|---|---|
| Moms | Pet‑centric | Cat wearing a witch hat | Use a soft‑touch ink for the hat brim |
| Dads | Hobby‑mix | Gardening pumpkin | Keep greens muted to avoid colour shift |
| Teachers | Pop‑culture | Comic‑panel ghost | Bold outlines for readability on dark tees |
| Nurses | Local landmark | City skyline with a bat | High‑contrast silhouette for night‑shift lighting |
How to bring a niche from idea to POD
First, sketch a rough version on paper – you don’t need perfect lines yet. Then fire it up in your favourite design tool (Canva works fine for quick mock‑ups).
Set the canvas to 300 dpi, export as a PNG with a transparent background, and double‑check the colour profile is sRGB. That’s the sweet spot for most POD platforms, including TeninoVentures.
Before you hit “publish”, order a single sample. Slip it on, check the niche detail is crisp, and make sure the shirt feels comfortable for a full day of trick‑or‑treating or a night‑shift break.
Next step: dive deeper into design fundamentals
If you’re hungry for a more detailed walkthrough on file prep, colour choices, and mock‑up tools, check out our print‑on‑demand design basics guide. It’s packed with the same practical steps we use when fine‑tuning niche Halloween tees.
Bottom line: a well‑chosen niche turns a seasonal shirt into a personal statement. Pick a theme that mirrors your buyer’s world, keep the artwork clean, test a sample, and watch the orders roll in.
FAQ
What exactly is Halloween t-shirt print on demand, and why should I consider it for my family-friendly shop?
Halloween t-shirt print on demand means you design shirts and a printing partner ships them only when customers order. No bulk inventory. For Moms, Dads, Teachers, and Nurses, it’s a low-risk way to test playful ideas, seasonal themes, and classroom-friendly messages. With a 2026 mindset, you can iterate fast, swap designs weekly, and keep inventory lean. It’s the kind of flexibility TeninoVentures has seen deliver real results for busy families and classrooms alike.
In our experience, the strongest wins come from pairing crisp silhouettes with short, readable copy. Start with one theme, order a sample, and watch the print fidelity through a wash test. If it survives, you’ve found a winner for the next pumpkin patch.
How do I choose the right POD partner for Halloween t-shirt print on demand?
First, assess print quality and fabric. You want sharp, fade-resistant graphics on both light and dark tees. Check how they handle bold colors on black fabrics, and whether they offer DTG or transfer options that stay smooth after several washes. Request samples to verify alignment, stitching, and sizing accuracy. Then review lead times, shipping costs, and return policies. Platforms like TeninoVentures make this easier by coordinating fulfillment and providing mockups for your product pages.
What design ideas tend to convert for Moms, Dads, Teachers, and Nurses?
When it comes to design ideas, these four groups respond to distinct cues. Moms love playful puns and soft, hand‑drawn graphics. Dads respond to bold icons with a touch of humor. Teachers lean into classroom‑friendly messages and vintage or retro looks. Nurses appreciate clean, professional graphics with a subtle nod to the night shift. Keep silhouettes strong, colors limited to two or three, and test variations with quick mockups.
In practice, start with one vibe—like a spooky classic skull on a dark shirt—or a retro cassette‑tape design with a short phrase. Use short copy and ensure it reads at a glance. Then order a sample to confirm legibility after washing and to validate how the design sits on different sizes. This keeps your launch lean and scalable for 2026 demand.
How should I price Halloween t-shirts to maximize profit on POD?
Pricing should cover base costs and leave room for margins. Start with the base garment, printing, packaging, and platform fees. A practical target is about a 40–60% gross margin per unit in 2026. If your base plus printing lands at £6–£8, aim for a final price around £12–£16, depending on design complexity and audience. Experiment with bundles (two or three shirts) to lift average order value without eroding margins.
What are common production pitfalls and how can I avoid them?
Common pitfalls include blurry artwork, color bleed on dark fabrics, misalignment during printing, and underestimating wash durability. To avoid them, use vector artwork or high‑resolution PNGs at 300 DPI, preview on light and dark tees, and order a sample to test ink and alignment. Confirm the print method suits your design and check seam placement for different sizes. Keep files tidy and fonts legible to prevent pixelation.
What quick wins can I implement this week to start selling?
Start with two niche themes, create 3–5 ready‑to‑list mockups, and lock in one reliable POD partner. Craft SEO‑friendly product titles and short benefit‑driven descriptions for Moms and Nurses. List a few sizes and offer a small bundle to boost value. Promote a short flash sale to test demand, and gather feedback from early buyers to refine images and copy for 2026 demand peaks.
Conclusion
We’ve walked through everything from niche ideas to pricing tricks, so you probably feel a little less overwhelmed about launching your Halloween t‑shirt print on demand line.
Think about the moment you first saw a design that made you smile – that spark is exactly what your customers are hunting for. If you can give moms a cozy pumpkin pun, dads a retro arcade vibe, teachers a classroom‑ready ghost, or nurses a subtle night‑shift badge, you’re already speaking their language.
So, what’s the next step? Grab the template you liked most, order a single sample from your POD partner, and test it in real life – wash it, wear it, snap a photo. Those tiny details (ink staying vivid, seams feeling soft) are what turn a good idea into a repeat purchase.
Remember, margins work best when you keep production costs low and price around £12‑£16, just as we’ve suggested earlier. Bundles and limited‑edition releases can push the average order value without cheapening the design.
Finally, don’t let perfection stall you. Launch, listen to feedback, tweak, and repeat. In 2026 the Halloween market is still hungry for fresh, authentic tees, and you’ve got the know‑how to feed it.
Ready to print? Let’s make this Halloween unforgettable together.
Leave a comment
This site is protected by hCaptcha and the hCaptcha Privacy Policy and Terms of Service apply.