
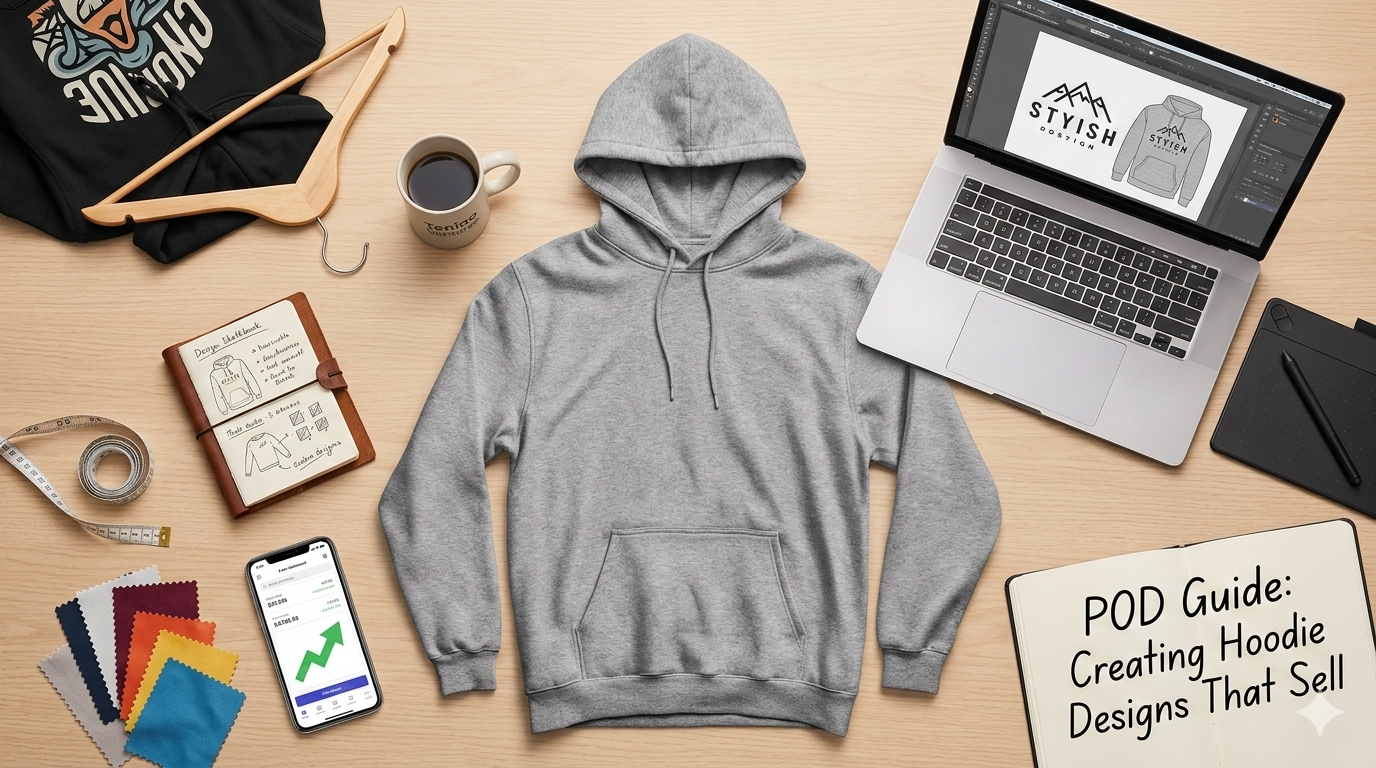
How to Create a Custom Hoodie Print on Demand Design That Sells
Ever stared at a plain hoodie and thought, “If only I could splash my own design on this?”
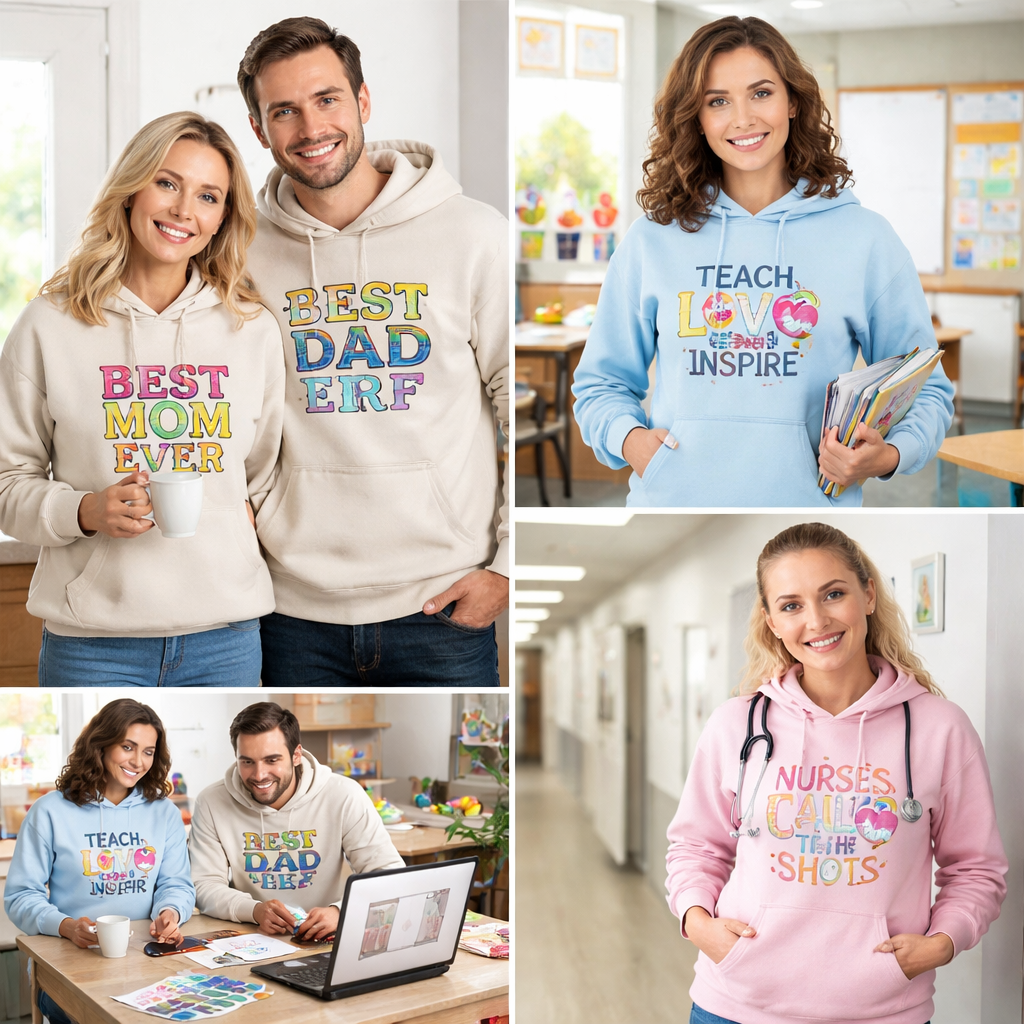
You’re not alone. Moms juggling school runs, dads chasing after soccer practice, teachers looking for a subtle way to show school spirit, and nurses craving a quick mood‑boost after a long shift all face that same itch. The good news? Custom hoodie print on demand design lets you turn that blank canvas into something personal without ordering a whole bulk pile.
In our experience at TeninoVentures, the magic starts with a simple idea—maybe a funny quote that only your classroom gets, a tiny heart for the kids’ bedtime story, or a bold logo that says “I’m a proud night‑shift hero.” From there, you upload the artwork, pick your hoodie colour, and let the POD platform handle the printing, packaging, and shipping straight to your doorstep.
But here’s the catch: not every design will look as crisp as you imagine. A low‑resolution file can turn a sharp graphic into a fuzzy mess, and the wrong placement can make a design disappear into a seam. That’s why we always suggest starting with a vector file or a high‑resolution PNG, and using the template tools most POD services provide.
So, what should you focus on first? Think about the story you want the hoodie to tell. Is it a cheeky meme that’ll get laughs in the teacher’s lounge? A family crest that’ll make mom feel proud at the weekend BBQ? When you nail the narrative, the design choices—fonts, colours, and placement—fall into place.
And don’t forget the practical side. Choose a fabric blend that feels soft but durable enough for daily wear, and check the print method: screen printing works great for bold, single‑colour designs, while DTG (direct‑to‑garment) handles intricate, multi‑colour art without breaking the bank.
Ready to give your hoodie a personality? Grab a sketch, fire up the design tool, and watch the transformation happen. In the next sections we’ll walk through picking the right software, prepping your files, and launching your custom hoodie without a hitch.
And if you ever feel stuck, remember there’s a community of parents, educators, and healthcare heroes just like you, swapping design ideas on forums and social groups. A fresh perspective can spark the perfect graphic you never thought of.
TL;DR
Custom hoodie print on demand design lets busy moms, dads, teachers, and nurses turn a plain sweatshirt into a personal statement without buying bulk.
Start with a high‑resolution file, pick the right fabric blend, and let TeninoVentures handle printing and shipping so you can wear your story tomorrow, easily today.
Step 1: Choose the Right POD Platform for Your Custom Hoodie Design
So you’ve dreamed up that perfect hoodie graphic – maybe a witty quote for the teachers’ lounge or a bright mascot for the kids’ soccer team – and now you need a place that actually prints it the way you picture. The first decision feels huge, but it’s really just about matching your needs with the platform’s strengths.
Ask yourself: do you need a super‑quick turnaround for a one‑off birthday gift, or are you planning to sell a small batch to fellow nurses at the hospital? Some platforms excel at fast, on‑demand dropshipping, while others give you deeper control over fabrics, printing methods, and profit margins.
What to look for in a POD platform
Print method that fits your design. If your hoodie art is bold, solid colours, screen printing will keep the colours vibrant and the cost low. For intricate, multi‑colour illustrations – think of a detailed family crest – direct‑to‑garment (DTG) is the way to go because it reproduces fine details without extra set‑up fees.
Fabric options. Moms love a soft, cotton‑rich blend that feels gentle on a baby’s skin, while dads might prefer a heavier fleece for chilly evenings on the patio. Look for platforms that list weight (grams per square metre) and material composition so you can pick the right feel.
Shipping speed and locations. A teacher in a rural district will appreciate a platform with US‑based fulfillment centres to avoid long delivery windows. Nurses on night shift often need same‑day or next‑day shipping for last‑minute morale‑boosting gifts.
In our experience at TeninoVentures, we’ve found that a platform that bundles design tools with clear mock‑up previews saves a lot of back‑and‑forth. When the preview looks exactly like the hoodie you imagined, you’re less likely to get a surprise when the product arrives.
One handy tip: test the platform’s customer service before you commit. Send a quick question about colour‑matching or sizing and see how fast and helpful the reply is. That little interaction can tell you a lot about the experience your own buyers will get.
Internal resource you might find useful
When you’re weighing options, you might also want to peek at our Minimalist Phone Case Print on Demand: A Practical Guide for Creators. Even though it’s about phone cases, the checklist for evaluating POD providers – print quality, material options, and fulfilment speed – works the same for hoodies.
Now, let’s talk tools that can boost the visibility of your custom hoodie once it’s live. A solid SEO content writer can help you craft product descriptions that rank in Google, pulling in traffic from busy parents searching “custom hoodie for teachers”. If you’re curious about a reliable solution, check out RebelGrowth’s SEO content writer software. It walks you through keyword research, meta‑tags, and even suggests headline tweaks that speak directly to moms and dads.
And if you’re planning a school event or a community fundraiser, pairing your hoodie order with a photo‑booth can turn the day into a memorable brand experience. Imagine a photo‑booth backdrop that matches the hoodie design – kids pose, parents snap pictures, and everyone leaves with a coordinated souvenir. Learn more about that combo at Captured Celebrations, which offers photo‑booth rentals that pair perfectly with custom apparel.
Below is a quick checklist you can print out or save on your phone before you sign up with a POD service:
- Print method (screen vs DTG) matches design complexity.
- Fabric blend (cotton, polyester, fleece) suits your audience.
- Shipping locations and speed align with your timeline.
- Design mock‑up tool provides accurate visualisation.
- Customer support responsiveness.
- Pricing structure (base cost, shipping, fees) fits your budget.
Once you’ve ticked those boxes, you’re ready to upload your artwork, set your price, and hit “publish”. From there, the platform handles production and delivery while you focus on spreading the word.
Here’s a short video that walks through the typical onboarding flow on a popular POD site – it’ll give you a feel for the dashboard, file upload, and preview steps.
Take a moment to watch, then grab a coffee and start testing a few platforms side‑by‑side. You’ll soon see which one feels like the right fit for your custom hoodie vision.

Step 2: Select Print Techniques and Materials – A Comparison Table
So you’re narrowing down how your design actually lands on fabric. This is where the print technique and the fabric you choose matter more than the color of the hoodie itself. In our experience with custom hoodie print on demand design, the method you pick changes the look, feel, and durability more than you might expect.
DTG, screen printing, and heat transfer each bring a different vibe. DTG shines for multi‑color artwork on cotton‑rich blends and feels soft to the touch. Screen printing is a cost‑savvy option for bold, single‑color statements and holds up well on midweight fleece. Heat transfer offers flexibility for small runs and complex shapes, but can feel heavier and may crack if not finished carefully.
Fabric matters too. A midweight cotton‑poly hoodie drinks ink differently than pure cotton or dense fleece. If your art includes fine lines or tiny text, DTG usually preserves detail better on lighter fabrics, while screen printing keeps color edges crisp on dark hoodies with proper pretreatment. Ask your POD partner about color accuracy across light and dark garments; it saves rework later and keeps your design looking intentional rather than accidental.
Branding touches like inside labels or branded packaging can add polish for events or school groups. And yes, some platforms let you test different print methods to see what your audience of moms, dads, teachers, and nurses actually responds to. This is where a thoughtful blend of technique and material choices makes your custom hoodie print on demand design feel deliberate and premium—not rushed.
If you’re wondering where to start, imagine what your story needs: a bold single color for quick recognition, or a vibrant, multi‑color scene for closer inspection. The right combination saves time, protects margins, and ensures wear‑and‑wash realism for real people juggling real days. For a practical starter that translates well to hoodies, consider this approach in parallel with a quick look at a related field: Minimalist Phone Case Print on Demand: A Practical Guide for Creators to see how design decisions carry across products.
Print methods at a glance
| Print Method | Strengths | Best For | Notes | <
|---|---|---|---|
| DTG (Direct‑to‑Garment) | Handles multi‑color artwork; soft hand feel | Cotton‑rich blends; light to mid‑dark hoodies | Excellent detail, good color depth; pretreatment may be required on darker fabrics |
| Screen Printing | Bold, durable colors; cost effective at scale | Single or few colors on midweight fleece | Less ideal for fine gradients; setup costs grow with more colors |
| Heat Transfer (vinyl/film) | Great for small runs and complex shapes | Low‑volume campaigns; quick turnarounds | Can add weight; edges may lift with repeated washing |
| Embroidery | Premium look; durable on logos | Chest or sleeve accents; simple logos | Higher cost; color options limited; not a true ink print |
Does this really help you decide? It should. The combo you choose will influence not just the feel of the fabric but also how you scale orders for schools, teams, or shift workers who wear these hoodies every day. In our experience at TeninoVentures, starting with DTG for intricate, colorful designs and pairing screen printing for bulk, high‑visibility orders often hits the sweet spot for accessibility and durability.
So, what’s your next move? Map your top three designs to two or three fabrics, then test a small run with two methods. This keeps risk low while you learn what your audience actually wears, washes, and shows off in the wild. And if you’re unsure where to begin, we can help you line up a straightforward pilot that fits a classroom schedule or hospital shift pattern.
Step 3: Create Eye‑Catching Designs Using Design Tools
Okay, you’ve picked your hoodie fabric and print method – now the fun part begins: turning that blank canvas into something that makes a mom smile, a teacher grin, or a nurse feel a little more seen. The secret isn’t magic; it’s having the right tools and a little bit of process.
Pick a tool that matches your comfort level
If you’re comfortable with Adobe’s suite, Illustrator or Photoshop give you pixel‑perfect control. But if you’re more of a “sketch on my phone then upload” kind of person, free web‑based apps like Canva, Placeit, or the built‑in mockup generators on many POD platforms work just fine.
We’ve found that many of our customers start with Canva because it’s intuitive, has pre‑sized hoodie templates, and lets you drag‑and‑drop fonts and icons without worrying about DPI. The key is to choose a tool that lets you export a high‑resolution PNG (300 dpi) or a vector file (SVG, AI) – those formats keep your design crisp after the printer’s pretreatment step.
Set up a reliable canvas
First thing’s first: open the exact hoodie template your POD service provides. Those templates include seam lines, printable area, and safe‑zone margins. Ignoring them can lead to a design that disappears into a sleeve seam or gets cut off at the neckline.
Tip: create a separate “safe zone” layer that’s a few millimetres inside the printable area. Anything outside that layer should be considered optional decoration – you’ll thank yourself when the final product looks exactly as you imagined.
Choose colours that pop on fabric
Remember, a hoodie isn’t a flat screen. Dark fabrics absorb more ink, so lighter colours need a bit more contrast. Use a colour‑contrast checker or simply print a small swatch on paper, then hold it up to a dark fabric sample. If you’re unsure, stick to a limited palette – two or three colours keep the file size low and the print reliable.
For moms who love pastel baby‑shower themes, a soft pink on a charcoal hoodie looks striking because the dark background makes the pastel pop. For teachers who want bold varsity‑style graphics, a bright navy with white accents works the same way.
Typography that stays readable
It’s tempting to load a fancy script for that “hand‑written” vibe, but small text can bleed on DTG prints, especially after a wash. Test your text at the actual size it will appear on the hoodie – usually no smaller than 12 pt for most fonts. If you need a decorative font, pair it with a clean sans‑serif for the bulk of the copy.
Here’s a quick checklist:
- Is the font legible at 1‑inch height?
- Does it have enough spacing from other elements?
- Have you outlined the font (convert to paths) if you’re exporting a vector?
Layering and effects
Shadows, gradients, and textures look gorgeous on screen, but they can become muddy on fabric. If you really love a gradient, keep it subtle – a two‑tone gradient is safer than a rainbow blend. Likewise, avoid heavy drop shadows; a simple outline often does the trick.
When you need a distressed look, create a separate “grunge” layer that you can toggle on or off. That way you can test a clean version versus a weathered version without re‑creating the whole file.
Export, double‑check, and upload
Once your design feels solid, export it in the format your POD platform recommends – usually PNG with a transparent background for DTG or SVG for vector‑based printing. Before you hit upload, open the file in a fresh viewer to confirm no hidden layers or stray pixels are lurking.
Pro tip: name your file with the hoodie colour and design name, like midnight‑blue‑school‑spirit.svg. It keeps your assets tidy and helps the production team match the right file to the right garment.
Need a quick reference?
For a step‑by‑step walkthrough of a similar design workflow, check out our guide on design workflow tips for print‑on‑demand products. The principles are the same, just swapped from a phone case to a hoodie.
So, what’s the next move? Open your chosen tool, pull up the template, and start sketching. Keep the safe zone in mind, test colours on fabric, and watch your idea turn into a wearable piece of art that moms, dads, teachers, and nurses will actually want to wear day after day.
Step 4: Set Up Product Options and Pricing
You’ve chosen the hoodie fabrics, picked print methods, and sketched the story. Now it’s time to lock in the options you’ll actually offer and get pricing that keeps your margins healthy without scaring away shoppers—especially busy moms, dads, teachers, and nurses who want clarity and value.
Think of this as the real-world menu for your custom hoodie print on demand design. A clean, repeatable set of choices makes ordering easy for your audience and reduces back‑and‑forth for you. And yes, small tweaks here can make a big difference in what people actually buy.
So, what should you set up first? Start with a compact, stockable catalog. You’ll want 2–3 hoodie fabrics, 2–4 colors per garment, and 1–2 print methods that you know you can deliver reliably. Inside-labels or branded packaging are nice touches for events or schools, but only if they fit your timeline and budget. Keep things simple enough that you can promise a smooth, consistent experience to buyers who’ll wear these day after day.
Define the core product catalog
List the exact hoodie options you’ll offer: fabric blends (e.g., midweight cotton‑poly), weight ranges, and fit notes (standard, relaxed, youth). Pair each with a few color options that display well with your artwork. For prints, decide whether a design will (a) rely on DTG for multi‑color art, (b) use screen printing for bold single‑color statements, or (c) a mix depending on the order size. This clarity saves you from last‑minute surprises and keeps your customers confident in what they’ll get.
Also decide about packaging and inserts. A simple thank‑you card, care instructions, and a tiny label can elevate perceived value without slowing fulfillment. And remember your audience: teachers appreciate crisp, legible designs; nurses need prints that survive washing and frequent lounging on shifts.
Pricing strategy that sells
Pricing isn’t just number bingo. It’s about margins and perception. Start with a base unit price that covers raw costs, printing, and fulfillment, then layer in setup fees, color-change costs, and any minimums. If you’re targeting schools or hospital groups, consider tiered pricing by order size or color runs to simplify approvals and keep the math honest.
Think in bundles. A family pack (two hoodies + two friends’ sizes) or a school event package can unlock value without complicating inventory. Show savings clearly—avoid hidden fees and surprise color upcharges. And always test a small batch with real buyers before a big push.
Practical steps to implement
Write down your top three designs and map them to two fabrics and two print methods. Create a one‑page price sheet with line items for base price, setup, and any extras, plus a recommended retail price. Build one or two ready‑to‑shop SKUs for quick listing on your store, and a second SKU for bundles or events.
In our experience at TeninoVentures, keeping options tight but flexible reduces back‑and‑forth and speeds timelines. It also helps you stay human to your buyers—parents planning school nights, nurses coordinating scrubs and shifts, and teachers managing busy classrooms.
For a starter workflow you can adapt to hoodies, see how others handled similar POD projects with a simple, proven approach at Minimalist Phone Case Print on Demand: A Practical Guide for Creators. It’s not the same product, but the thinking translates nicely.
So, what’s your next move? Lock in the core options, set clear pricing, and test with a small group before you scale. It’s amazing how much confidence a clean menu and transparent costs can give your hoodie line.
Step 5: Optimize Your Listing for SEO and Conversions
We've gotten you to the point where the hoodie is ready to ship – now the real work is getting the right people to click, read, and buy. If you stare at a blank product page, it can feel like you’re shouting into an empty room. Let’s turn that quiet into a conversation.
Craft a click‑worthy title
Search engines and shoppers both read the first 60 characters like a headline. Put the primary keyword custom hoodie print on demand design right up front, then add a benefit or hook. For example: “Custom Hoodie Print on Demand Design – Soft‑Fit, Vibrant Colours, Fast Shipping.” You’re telling Google what the page is about and giving a busy mom or teacher a reason to keep reading.
Write a meta description that sells
Think of the meta description as a mini‑elevator pitch. Keep it under 160 characters, sprinkle the keyword once, and end with a clear call‑to‑action. Something like: “Create your own hoodie with our print‑on‑demand service. High‑quality DTG, no minimums – order yours today!” This line shows up under the title in search results, so make it feel personal.
Use natural, benefit‑focused copy
When you write the product description, avoid a laundry list of specs. Start with a relatable scenario: “Picture yourself pulling on a soft, custom‑printed hoodie after a long shift – the design stays crisp wash after wash.” Then weave in details about fabric blend, print method, and sizing. Sprinkle the keyword a couple of times, but let the prose flow like you’re talking to a friend.
Highlight the details that matter
- Fabric: mid‑weight cotton‑poly blend (8 oz) – breathable yet warm.
- Print method: DTG for full‑colour artwork, screen printing for bold single‑colour runs.
- Fit options: regular, relaxed, youth.
- Care instructions: machine wash cold, tumble low, hang‑dry.
Bullet points scan quickly on mobile and give shoppers the reassurance they need before they add to cart.
Image optimisation matters
Use at least three high‑resolution photos: a plain front view, a close‑up of the print, and a lifestyle shot of a parent or nurse wearing the hoodie. Name the files with descriptive, keyword‑rich names (e.g., custom-hoodie‑dtg‑front.jpg) and add alt text that describes the scene, not just “image1.” This helps visually‑impaired users and gives Google another clue about relevance.
Variants, SKUs and inventory
Each colour‑size combo needs its own SKU so you can track sales and avoid overselling. Keep the naming consistent (e.g., HH‑BLU‑M for a medium blue hoodie). When you set up variants in Etsy or your own store, make sure the drop‑down menus are intuitive – a busy dad shouldn’t have to hunt for the right size.
Pricing transparency and shipping
Show the base price, any setup fees, and the final retail price side by side. If you offer free shipping over a certain amount, display that badge prominently. Trust is built when shoppers see no hidden costs – especially teachers ordering for a class.
Social proof without fabricating
Encourage buyers to leave a short review after they receive the hoodie. Pull a couple of authentic, recent quotes into the product page as a scrolling carousel. Real feedback from other moms, dads, teachers, or nurses beats any generic “best quality” claim.
Add structured data
Implement product schema markup (JSON‑LD) so search engines can show price, availability, and review stars directly in the SERP. It’s a tiny technical step that can boost click‑through rates dramatically.
Test, test, test
Run A/B tests on two versions of the headline or the CTA button colour. Track conversion rates for at least a week before deciding which performs better. Small tweaks often move the needle more than a complete rewrite.
Finish with a clear call‑to‑action
End the description with a friendly prompt: “Ready to wear your story? Choose your colour below and hit ‘Add to Cart.’” Pair it with a contrasting button so the eye is drawn straight there.
If you want a deeper dive into crafting compelling product copy, check out our guide on everything you need to know about custom floral mug print on demand. The principles translate perfectly to hoodies and will help you write copy that feels personal, not salesy.
Step 6: Launch, Promote, and Manage Orders
Okay, you’ve got the designs, the fabrics, the price sheet. Now what? Launch day isn’t a single moment; it’s a steady wave of small moves that get your hoodies into hands. For busy moms, dads, teachers, and nurses, clarity and reliability beat hype every time.
First, get orders moving with a simple checkout flow. Make sure your product pages answer the common questions fast: sizing, wash care, delivery estimates. If you’re serving schools or hospital teams, offer a bulk-order option with one-click extras. It isn’t flashy, but it’s the difference between "order placed" and "order arrived."
Does this really work? We’ve seen consistent wins stack into real momentum. Start with a clean catalog: 2–3 hoodie styles, 2–4 colors, and a couple of reliable print methods. Keep the process straightforward so a busy teacher or nurse can confidently order for a class or shift crew.
Next, promote without turning people off. Use social posts that show real wear: a teacher in a classroom, a nurse stepping into her shift, a parent grabbing the kids after practice. Highlight practical benefits: durable prints after multiple washes, comfy fits, quick shipping. A quick “how it wears” photo carousel beats a generic promo any day.
But get the messaging right. Lead with story rather than specs. Think: wear-your-story messaging instead of dry tech terms. And yes, have a single, obvious CTA on every product page. A bright Add to Cart button drawn in by color contrast reduces hesitation and friction.
Here’s a practical setup you can copy. Create one or two SKUs for core colors and sizes. Use a simple price sheet and a clear shipping policy. If you’re serving schools or hospitals, offer a straightforward group discount and a friendly return window. You’ll thank yourself when approvals aren’t a millisecond away.
We’ll talk about measurement and optimization in the next section, but a quick heads‑up: set up basic order-tracking emails so buyers aren’t left wondering where their hoodie is. Simple notifications save support time and build trust with customers who’ll wear these day after day—moms, dads, teachers, and nurses alike.
Promotions that feel natural
Run time-limited promos for events like back‑to‑school or Nurse Appreciation Week. Keep the focus on the story your hoodie tells and the everyday practicality of wearing it. A genuine offer beats a hard sell every time.
Managing orders with care
From the moment an order goes live to the moment it lands in a shopper’s mailbox, communicate clearly. If a print is off, own the mistake, offer a replacement, and ship promptly. Real people notice you treating issues with honesty, and they’ll come back for more orders down the line.
For a practical workflow that keeps everything organized, you can explore our design-to-delivery approach in other projects—and, if you want a deeper dive into the mechanics of how a simple system can scale, check out Minimalist Phone Case Print on Demand: A Practical Guide for Creators.
To keep things moving, we also share real‑world examples from moms and teachers who’ve coordinated group orders for field trips and school events. Your hoodies become not just a product, but a dependable part of everyday life.
For a hands‑on reference that translates to hoodie print on demand, consider this quick read on a related product workflow: Minimalist Phone Case Print on Demand: A Practical Guide for Creators.
And finally, lean on your community. TeninoVentures helps keep the logistics human—printing, packing, and shipping coordinated so those school nights, shift changes, and after‑care moments feel a little easier for families and frontline workers alike.
Conclusion
We've walked through everything from picking the right POD partner to testing prints on real families, teachers, and nurses. If any part felt overwhelming, remember: you don't need to master every detail you could ask for.
What really sticks? Keep the process simple, iterate fast, and let the people you serve—moms juggling school runs, dads planning reunions, teachers organising class merch, nurses covering night shifts—be the compass. Their feedback is the cheapest, most reliable quality check you could ask for.
So, what's the next step? Grab one design, order a single prototype in your favourite colour, wash it twice, and ask a friend to wear it on a busy day. If the print survives, you've got a launch‑ready product.
In our experience at TeninoVentures, that tiny loop of design‑sample‑feedback cuts weeks off the timeline and builds confidence before you ever hit a paid ad.
Finally, treat your hoodie line like a living collection. Keep an eye on which colours sell fastest, tweak the copy in your listings every month, and don't be afraid to retire a design that isn't resonating.
Ready to turn that sketch into a hoodie that people actually love? The engine is now in your hands—just press start.
Go ahead and launch today.
FAQ
What is the best print method for a custom hoodie print on demand design?
If you need full‑colour detail and a soft feel, Direct‑to‑Garment (DTG) is usually the go‑to because it lays water‑based ink straight onto a cotton‑rich blend, giving crisp gradients that survive a few washes. For bold, single‑colour graphics in larger batches, screen printing wins on durability and cost, especially when you ask your POD partner about water‑based inks that stay supple on fleece.
How do I choose the right fabric for my hoodie?
Think about who will be wearing it: moms love a 80 % cotton/20 % polyester blend for that cosy, breathable hug, while nurses often prefer a slightly heavier, moisture‑wicking fleece that holds up to night‑shift laundry. Order a swatch in your top colour, feel the weight, and picture the hoodie on a busy day – if it drapes nicely and doesn’t pill after a wash, you’ve nailed the fabric.
How many colors can I realistically use without blowing up cost?
Every extra colour adds a setup fee or a new screen, so most small‑batch creators stick to three‑to‑four hues at most. A clever trick is to keep the base hoodie a neutral shade and let the design do the colour work; you’ll keep margins healthy and still deliver eye‑catching graphics that pop on navy, charcoal or heather‑grey.
What’s the ideal sample order size before I go live?
We usually recommend ordering one sample of each colour‑design combo you plan to sell – that’s typically 2‑4 pieces total. Wear them, wash them twice, and ask a friend (maybe a teacher or a dad) to test the fit during a real‑world activity. Those quick hands‑on checks reveal seam stress, print cracking, or shrinkage before you invest in bulk inventory.
How can I ensure the print survives multiple washes?
Start by pre‑washing the hoodie to remove any sizing that could interfere with ink adhesion, then follow the care label: cold water, gentle cycle, and tumble dry low or air‑dry. Adding a clear, low‑pH detergent and avoiding fabric softener helps the ink stay vibrant – you’ll notice a big difference after the third wash.
How do I set pricing so moms and teachers feel it’s worth it?
Calculate your base cost, add a 30‑40 % margin to cover platform fees and a small profit, then offer a bulk discount for orders of 10 + – teachers love a class‑wide deal and moms appreciate a “buy two, get 10 % off” incentive. Transparent pricing (e.g., “$29 each, $24 each for 5‑plus”) builds trust and reduces cart abandonment.
Where can I find inspiration for kid‑friendly hoodie graphics?
Look at what’s trending in school‑yard art projects, local sports team mascots, or popular storybook characters that aren’t copyrighted – simple line‑drawings or bold silhouettes work great on fleece. Joining parent‑focused Facebook groups or teacher forums gives you a pulse on the motifs kids actually request, and you can sketch a quick mockup to test the idea before committing to production.

Leave a comment
This site is protected by hCaptcha and the hCaptcha Privacy Policy and Terms of Service apply.